> ## Documentation Index
> Fetch the complete documentation index at: https://help.broadstripes.com/llms.txt
> Use this file to discover all available pages before exploring further.
# Workplace tab
> Configure employment relationships and associations for your public form submissions
# Overview
The **Workplace** tab allows you to create an employment relationship for each form submission. If you prefer not to, you can skip this tab and use the default settings.
The Workplace tab only appears for **person forms**. Organization forms do not have this tab.
## Why Collect Employment Information?
Employment relationships are central to labor organizing campaigns. Collecting employer information lets you:
* Link workers to their employers (shops, departments, companies)
* Build shop lists and organizational charts
* Identify shop leaders and organizers
* Generate shop-specific reports
* Send targeted communications to specific workplaces
* Track organizing progress by location
## Create an employment relationship on your public form
Follow these steps to configure employment collection on your public form:
### Step 1: Navigate to the Workplace tab
To get started, select the **Workplace tab** in the public form editor.
### Step 2: Enable employment creation
To include employment information, turn on the toggle in the **Workplace** card at the top of the tab ("Enable the worker submitting the form to identify where they work"). The record connected to the form submission will now be **associated with an employer**. The rest of the tab's options stay grayed out until this toggle is on.
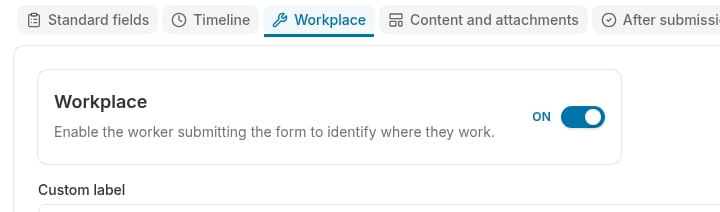 When enabled:
* An "Employer" field appears on the public form
* The submitter provides their employer information
* An employment relationship is created automatically
* The worker is linked to the organization in Broadstripes
When unchecked, no employer information is collected.
### Step 3: Create a custom label
Create a descriptive label for the employment input section using the **Custom label** field.
**Default**: "Employer"
**Custom label examples**:
* "Where do you work?"
* "Your employer"
* "Company name"
* "Shop name"
* "Worksite"
Choose language your audience will understand. "Where do you work?" is clearer than "Employer" for most workers.
### Step 4: Choose the matching method
Next, use the **"Choose the method by which the workplace for the employment will be identified:"** dropdown. This dropdown controls HOW workers will identify their employer on the form.
When enabled:
* An "Employer" field appears on the public form
* The submitter provides their employer information
* An employment relationship is created automatically
* The worker is linked to the organization in Broadstripes
When unchecked, no employer information is collected.
### Step 3: Create a custom label
Create a descriptive label for the employment input section using the **Custom label** field.
**Default**: "Employer"
**Custom label examples**:
* "Where do you work?"
* "Your employer"
* "Company name"
* "Shop name"
* "Worksite"
Choose language your audience will understand. "Where do you work?" is clearer than "Employer" for most workers.
### Step 4: Choose the matching method
Next, use the **"Choose the method by which the workplace for the employment will be identified:"** dropdown. This dropdown controls HOW workers will identify their employer on the form.
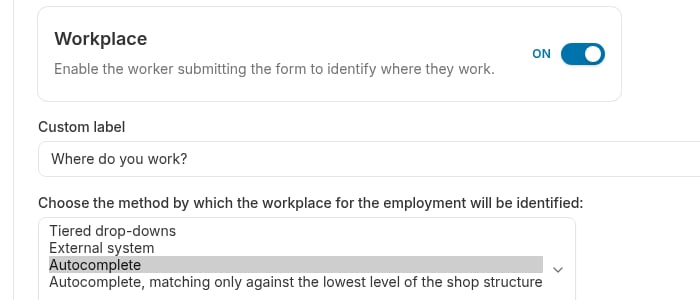 Four options are available:
#### Tiered drop-downs
The form recipient will select their employment information via drop-down menus, starting with the highest level of employment and then department and subdepartment, if applicable.
**How it works**:
* Multiple dropdown menus appear on the form
* First dropdown shows parent organizations
* Second dropdown shows child organizations within the selected parent
* Additional dropdowns may appear for deeper hierarchies
**Best for**:
* Campaigns with clear organizational hierarchies
* Large employers with multiple locations or departments
**Example**:
* First dropdown: Select your division (Northeast, Southeast, Central, West)
* Second dropdown: Select your facility (lists facilities in chosen division)
**Advantages**:
* Prevents typos and variations in employer names
* Forces structured data entry
* Easy for workers when hierarchy is clear
**Disadvantages**:
* Can be slow if hierarchy is deep or complex
* May confuse workers unfamiliar with the corporate structure
#### External system
Broadstripes will use the [external system](/docs/project-settings/external-systems-settings) you choose to make an employment association. You will also choose which external system value will be matched.
**How it works**:
* A single text input field appears
* Worker enters an identifier from an external system (employer ID, shop number, etc.)
* Broadstripes matches the identifier to an existing organization
**Configuration**:
When you select this option, you must also select which external system to use from the **"Choose the external system value that will entered to match the workplace:"** dropdown. This shows all external systems configured for your project.
**Best for**:
* Workers who know their employer ID or shop code
* Campaigns with integrated payroll or HR systems
* When you've imported organization data with external IDs
**Example**:
* Custom label: "Employee ID"
* External system: "Payroll System"
* Worker types: "E12345"
* Broadstripes finds the organization with external system ID "E12345"
**Advantages**:
* Fast for workers who know their ID
* Works well with HR system integrations
**Disadvantages**:
* Workers must know their ID
* Requires external system setup in Broadstripes
* Creates errors if worker enters wrong ID
#### Autocomplete
Broadstripes will automatically match existing shops/departments to recipients' input.
**How it works**:
* A single text input field appears with autocomplete
* As the worker types, matching organization names appear
* Worker selects their employer from the list
* Matches against organization names at ALL levels of hierarchy
**Best for**:
* Campaigns with many employers
* Workers who know their employer's name but not the formal hierarchy
* Mobile-friendly forms (less tapping than tiered dropdowns)
**Example**:
* Worker types "acme"
* Autocomplete shows: "Acme Corporation", "Acme West", "Acme Manufacturing"
* Worker selects the correct one
**Advantages**:
* Fast and intuitive
* Works on mobile devices
* No need to understand organizational hierarchy
**Disadvantages**:
* May show too many results for common names
#### Autocomplete, matching only against the lowest level of shop structure
A form of auto-matching that will only match on departments at the lowest level (works best for projects with unique department names).
**How it works**:
* Same as Autocomplete above, but...
* ONLY matches organization names at the lowest (leaf) level of the hierarchy
* Excludes parent organizations from autocomplete results
**Best for**:
* Campaigns where workers should only be employed at specific locations, not parent companies
* Avoiding confusion between "Acme Corporation" (parent) and "Acme Plant 3" (actual worksite)
* Ensuring workers are linked to the most specific level
**Example**:
* Organization hierarchy: Acme Corp → Acme Northeast → Acme Plant 3
* Regular autocomplete would show all three when typing "acme"
* Leaf node autocomplete ONLY shows "Acme Plant 3"
**Advantages**:
* Prevents workers from selecting parent organizations inappropriately
* Ensures precise location data
* Cleaner autocomplete results
**Disadvantages**:
* Requires well-structured organization hierarchy in Broadstripes
* May not show any results if hierarchy isn't set up correctly
* Can confuse workers if the "leaf node" isn't how they think of their employer
### Step 5: Configure employer email notifications (optional)
A form can be set to automatically send the employer a copy of the recipient's form submission. You will configure this option on the [Confirmation email tab](./email-tab). This will require you to have contact information for the employer in your project, specifically an email address.
See the Confirmation email tab to enable automatic email messages to employers and others after form submission.
### Step 6: Enable multiple employments (optional)
Under the **Multiple employments** heading, check the **"Enable submitters to identify multiple workplaces (creating multiple employments)"** box to enable form recipients to create multiple employment relationships.
Four options are available:
#### Tiered drop-downs
The form recipient will select their employment information via drop-down menus, starting with the highest level of employment and then department and subdepartment, if applicable.
**How it works**:
* Multiple dropdown menus appear on the form
* First dropdown shows parent organizations
* Second dropdown shows child organizations within the selected parent
* Additional dropdowns may appear for deeper hierarchies
**Best for**:
* Campaigns with clear organizational hierarchies
* Large employers with multiple locations or departments
**Example**:
* First dropdown: Select your division (Northeast, Southeast, Central, West)
* Second dropdown: Select your facility (lists facilities in chosen division)
**Advantages**:
* Prevents typos and variations in employer names
* Forces structured data entry
* Easy for workers when hierarchy is clear
**Disadvantages**:
* Can be slow if hierarchy is deep or complex
* May confuse workers unfamiliar with the corporate structure
#### External system
Broadstripes will use the [external system](/docs/project-settings/external-systems-settings) you choose to make an employment association. You will also choose which external system value will be matched.
**How it works**:
* A single text input field appears
* Worker enters an identifier from an external system (employer ID, shop number, etc.)
* Broadstripes matches the identifier to an existing organization
**Configuration**:
When you select this option, you must also select which external system to use from the **"Choose the external system value that will entered to match the workplace:"** dropdown. This shows all external systems configured for your project.
**Best for**:
* Workers who know their employer ID or shop code
* Campaigns with integrated payroll or HR systems
* When you've imported organization data with external IDs
**Example**:
* Custom label: "Employee ID"
* External system: "Payroll System"
* Worker types: "E12345"
* Broadstripes finds the organization with external system ID "E12345"
**Advantages**:
* Fast for workers who know their ID
* Works well with HR system integrations
**Disadvantages**:
* Workers must know their ID
* Requires external system setup in Broadstripes
* Creates errors if worker enters wrong ID
#### Autocomplete
Broadstripes will automatically match existing shops/departments to recipients' input.
**How it works**:
* A single text input field appears with autocomplete
* As the worker types, matching organization names appear
* Worker selects their employer from the list
* Matches against organization names at ALL levels of hierarchy
**Best for**:
* Campaigns with many employers
* Workers who know their employer's name but not the formal hierarchy
* Mobile-friendly forms (less tapping than tiered dropdowns)
**Example**:
* Worker types "acme"
* Autocomplete shows: "Acme Corporation", "Acme West", "Acme Manufacturing"
* Worker selects the correct one
**Advantages**:
* Fast and intuitive
* Works on mobile devices
* No need to understand organizational hierarchy
**Disadvantages**:
* May show too many results for common names
#### Autocomplete, matching only against the lowest level of shop structure
A form of auto-matching that will only match on departments at the lowest level (works best for projects with unique department names).
**How it works**:
* Same as Autocomplete above, but...
* ONLY matches organization names at the lowest (leaf) level of the hierarchy
* Excludes parent organizations from autocomplete results
**Best for**:
* Campaigns where workers should only be employed at specific locations, not parent companies
* Avoiding confusion between "Acme Corporation" (parent) and "Acme Plant 3" (actual worksite)
* Ensuring workers are linked to the most specific level
**Example**:
* Organization hierarchy: Acme Corp → Acme Northeast → Acme Plant 3
* Regular autocomplete would show all three when typing "acme"
* Leaf node autocomplete ONLY shows "Acme Plant 3"
**Advantages**:
* Prevents workers from selecting parent organizations inappropriately
* Ensures precise location data
* Cleaner autocomplete results
**Disadvantages**:
* Requires well-structured organization hierarchy in Broadstripes
* May not show any results if hierarchy isn't set up correctly
* Can confuse workers if the "leaf node" isn't how they think of their employer
### Step 5: Configure employer email notifications (optional)
A form can be set to automatically send the employer a copy of the recipient's form submission. You will configure this option on the [Confirmation email tab](./email-tab). This will require you to have contact information for the employer in your project, specifically an email address.
See the Confirmation email tab to enable automatic email messages to employers and others after form submission.
### Step 6: Enable multiple employments (optional)
Under the **Multiple employments** heading, check the **"Enable submitters to identify multiple workplaces (creating multiple employments)"** box to enable form recipients to create multiple employment relationships.
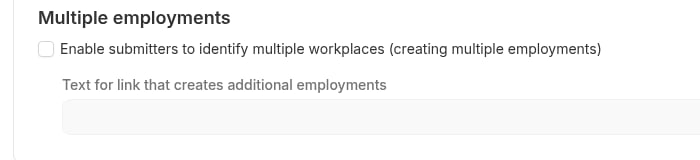 When enabled:
* Workers can add more than one employer on the form
* A link appears allowing them to add additional employments
* Useful for workers with multiple jobs or who work at multiple locations
When disabled (default):
* Workers can only specify one employer
* Simpler form experience
In the **"Text for link that creates additional employments"** field, enter a custom label for the link that allows them to add additional employments.
**Default**: "Add another"
**Example alternatives**:
* "Add another job"
* "Add second workplace"
### Step 7: Save your work
Once you've configured your employment options, click **Save** or move on to the next tab to continue customizing your form.
## Common Configuration Examples
**Basic Manufacturing Shop Organizing**
**Configuration**:
* ☑ Create an employment
* Custom label: "Where do you work?"
* Selection method: Autocomplete (leaf node only)
* ☐ Allow multiple employments: No
**Result**: Simple, fast form where workers type their shop name and select from list.
**Large Multi-Site Employer**
**Configuration**:
* ☑ Create an employment
* Custom label: "Your location"
* Selection method: Tiered drop-downs
* ☐ Allow multiple employments: No
**Result**: Workers select from structured list of divisions and facilities.
**Industry with Many Casual Workers**
**Configuration**:
* ☑ Create an employment
* Custom label: "Current employer"
* Selection method: Autocomplete
* ☑ Allow multiple employments: Yes
* Additional employment label: "Add another job"
**Result**: Workers can add multiple employers where they currently work.
### Integrated HR external system IDs
**Configuration**:
* ☑ Create an employment
* Custom label: "Employer ID"
* Selection method: External system
* External system: "HR System"
* ☐ Allow multiple employments: No
**Result**: Workers enter their employer ID, and the system finds their employer automatically.
## Best Practices
**Match your selection method to your data**: If you have a clean organization hierarchy in Broadstripes, use tiered dropdowns. If not, autocomplete works better.
**Test with real workers**: What makes sense to you may confuse workers. Test the form with actual members of your audience.
**Consider mobile users**: Autocomplete works better on mobile than deep tiered dropdowns.
**Set up organizations first**: Employment matching only works if the employer organizations already exist in Broadstripes. Import or create them before launching your form.
**Use clear labels**: "Where do you work?" is clearer than "Employing organization" for most audiences.
## Next Steps
Here are links to the other documentation pages for public forms:
* [Create a new public form](./create-public-form)
* [The "Standard fields" tab](./standard-fields-tab-in-public-form)
* [The "Timeline" tab](./timeline-tab)
* [The "Content and attachments" tab](./form-content-tab)
* [The "Confirmation email" tab](./email-tab)
* [The "After submission" tab](./other-options-tab)
* [Viewing and downloading public forms](./viewing-and-downloading-public-forms)
When enabled:
* Workers can add more than one employer on the form
* A link appears allowing them to add additional employments
* Useful for workers with multiple jobs or who work at multiple locations
When disabled (default):
* Workers can only specify one employer
* Simpler form experience
In the **"Text for link that creates additional employments"** field, enter a custom label for the link that allows them to add additional employments.
**Default**: "Add another"
**Example alternatives**:
* "Add another job"
* "Add second workplace"
### Step 7: Save your work
Once you've configured your employment options, click **Save** or move on to the next tab to continue customizing your form.
## Common Configuration Examples
**Basic Manufacturing Shop Organizing**
**Configuration**:
* ☑ Create an employment
* Custom label: "Where do you work?"
* Selection method: Autocomplete (leaf node only)
* ☐ Allow multiple employments: No
**Result**: Simple, fast form where workers type their shop name and select from list.
**Large Multi-Site Employer**
**Configuration**:
* ☑ Create an employment
* Custom label: "Your location"
* Selection method: Tiered drop-downs
* ☐ Allow multiple employments: No
**Result**: Workers select from structured list of divisions and facilities.
**Industry with Many Casual Workers**
**Configuration**:
* ☑ Create an employment
* Custom label: "Current employer"
* Selection method: Autocomplete
* ☑ Allow multiple employments: Yes
* Additional employment label: "Add another job"
**Result**: Workers can add multiple employers where they currently work.
### Integrated HR external system IDs
**Configuration**:
* ☑ Create an employment
* Custom label: "Employer ID"
* Selection method: External system
* External system: "HR System"
* ☐ Allow multiple employments: No
**Result**: Workers enter their employer ID, and the system finds their employer automatically.
## Best Practices
**Match your selection method to your data**: If you have a clean organization hierarchy in Broadstripes, use tiered dropdowns. If not, autocomplete works better.
**Test with real workers**: What makes sense to you may confuse workers. Test the form with actual members of your audience.
**Consider mobile users**: Autocomplete works better on mobile than deep tiered dropdowns.
**Set up organizations first**: Employment matching only works if the employer organizations already exist in Broadstripes. Import or create them before launching your form.
**Use clear labels**: "Where do you work?" is clearer than "Employing organization" for most audiences.
## Next Steps
Here are links to the other documentation pages for public forms:
* [Create a new public form](./create-public-form)
* [The "Standard fields" tab](./standard-fields-tab-in-public-form)
* [The "Timeline" tab](./timeline-tab)
* [The "Content and attachments" tab](./form-content-tab)
* [The "Confirmation email" tab](./email-tab)
* [The "After submission" tab](./other-options-tab)
* [Viewing and downloading public forms](./viewing-and-downloading-public-forms)