> ## Documentation Index
> Fetch the complete documentation index at: https://help.broadstripes.com/llms.txt
> Use this file to discover all available pages before exploring further.
# Content and attachments tab
> Customize your public form with logos, styling, links, content elements, and file attachments
# Overview
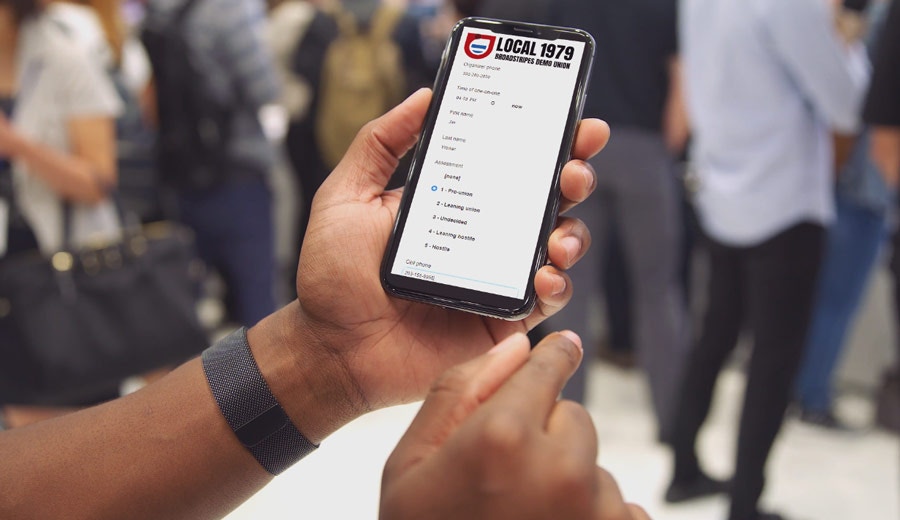 On the **Content and attachments tab**, you can add additional content and fields to a public form including your organization's **logo**, **website links** and **custom style elements**. You can also allow submitters to upload file attachments.
The Content and attachments tab controls the visual appearance and text content of your public form. This is where you customize what form submitters see when they open your form.
## Add a logo and other content
Follow these steps to customize the visual and textual content of your public form:
### Step 1: Navigate to the Content and attachments tab
To get started, select the **Content and attachments tab** in the public form editor.
### Step 2: Add a logo image
Add a **logo image** by clicking the dashed **Add a logo** tile and uploading your organization's logo, or by dragging an image file onto the tile. This will appear at the top of your public form. Horizontal banners tend to look best. The image should have a maximum width of 640px and a maximum height of 100px.
On the **Content and attachments tab**, you can add additional content and fields to a public form including your organization's **logo**, **website links** and **custom style elements**. You can also allow submitters to upload file attachments.
The Content and attachments tab controls the visual appearance and text content of your public form. This is where you customize what form submitters see when they open your form.
## Add a logo and other content
Follow these steps to customize the visual and textual content of your public form:
### Step 1: Navigate to the Content and attachments tab
To get started, select the **Content and attachments tab** in the public form editor.
### Step 2: Add a logo image
Add a **logo image** by clicking the dashed **Add a logo** tile and uploading your organization's logo, or by dragging an image file onto the tile. This will appear at the top of your public form. Horizontal banners tend to look best. The image should have a maximum width of 640px and a maximum height of 100px.
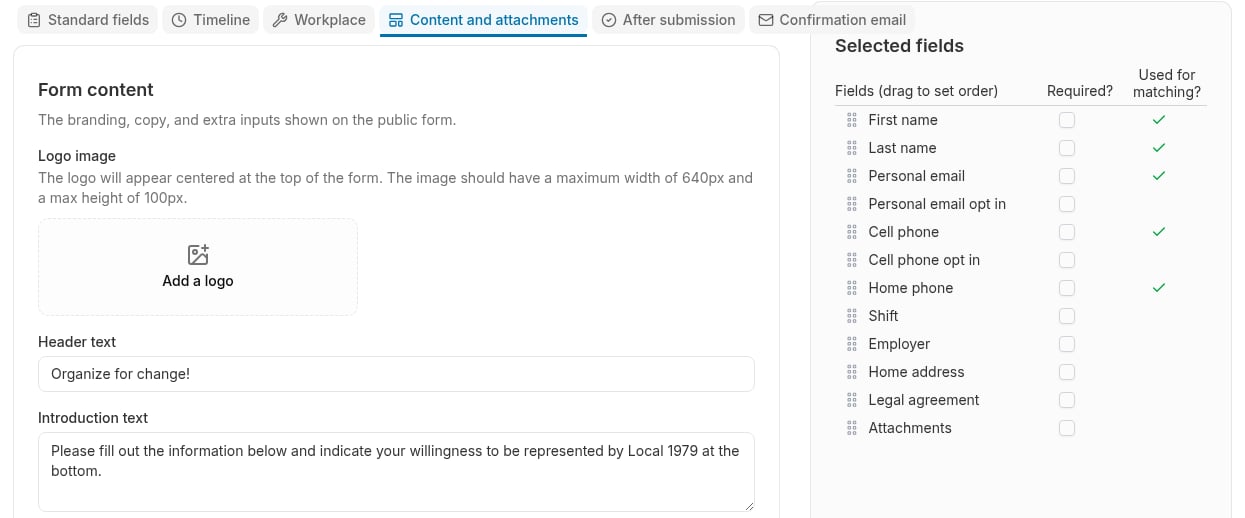 **To upload a logo**:
1. Click the **Add a logo** tile (or drag an image file onto it)
2. Navigate to your logo file on your computer
3. Select the image file
4. Click **Save** at the bottom of the form editor
**To remove a logo**:
1. Click **Remove** below the logo preview
2. Click **Save** at the bottom of the form editor
**To replace a logo**:
1. Click **Replace** below the logo preview and select a new logo
2. The new logo will replace the old one when you save
**Supported formats**: JPG, PNG, GIF
**Recommended size**: Maximum width of 640px and maximum height of 100px
**File size**: Keep the file small for the best experience on a mobile device
When you duplicate a form, the system attempts to copy the logo. If logo copying fails, you'll see a warning message and will need to re-upload the logo to the duplicated form.
### Step 3: Add Header Text
Below the logo, you can enter **Header Text**. This could be your organization's tagline or any title of your choosing.
This is the main title that appears at the top of your form, below the logo (if you uploaded one).
**Default**: If you leave this blank, the form NAME (from the top of the form editor) is used as the header.
**Examples**:
* "Worker Interest Card"
* "Join Our Campaign"
* "2025 Training Registration"
* "Tell Us Your Story"
* "Sign Up to Learn More"
**Best practices**:
* Keep it short (under 10 words)
* Use action-oriented language
* Make it welcoming and clear about the form's purpose
* Consider your audience's language and perspective
### Step 4: Add Introduction text
In the **Introduction** field, add a brief explanation or instructions for the form recipients. This is a good place to tell them what actions to take with the form.
This text appears below the header and above the form fields. Use it to:
* Explain the purpose of the form
* Set expectations (how long it takes, what happens next)
* Provide context or motivation
* Include any necessary disclaimers
**Example for a worker interest card**:
```
We're building a movement for better wages and working conditions. Fill out this form to join us and receive updates about our campaign. This form takes about 2 minutes to complete.
```
**Example for event registration**:
```
Join us for our monthly member meeting on March 15th at 6 PM. Fill out this form to RSVP and receive event details and reminders.
```
**Example for volunteer sign-up**:
```
Want to get involved? We need volunteers for phone banking, door knocking, and event support. Tell us what interests you and we'll be in touch with opportunities to get involved.
```
**Formatting**:
* The introduction text supports line breaks
* Keep paragraphs short for readability
* Consider bullet points for multiple ideas
* Don't make it too long--most people won't read more than 2-3 short paragraphs
**Best practices**:
* Answer "What is this for?" and "Why should I fill this out?"
* Set realistic time expectations
* Mention what happens after submission
* Use welcoming, inclusive language
* If required by law, include NLRB disclaimer: "Filling out this form does not obligate you to do anything or join anything."
## Customize your form with links and HTML styling
The **Introduction** text, **Form submission button text**, and **Legal agreement** fields support hyperlinks and HTML tags, allowing you to format and style your text.
For additional styling needs, please contact in-app support or [support@broadstripes.com](mailto:support@broadstripes.com)
### Step 5: Customize the submission button
Customize your form's **submission button** with a call to action. Create your custom text for submitting in the **"Form submission button text"** field.
This is the label on the button that submits the form.
**Default**: "Submit"
**Example alternatives**:
* "Join Us"
* "Sign Up"
* "Register"
* "Submit My Interest Card"
* "Count Me In"
* "I'm Interested"
* "Save My Information"
**Best practices**:
* Use action language that reflects what the user is doing
* Keep it short (1-3 words)
* Match the tone of your campaign
* Consider what commitment level you're asking for (avoid "JOIN THE UNION" if this is just an interest card)
### Step 6: Add a signature field (optional)
Select the **"Show signature field"** checkbox to allow submitters to sign the form using their mouse or finger.
When enabled:
* A signature capture field appears near the bottom of the form (above the submit button)
* Users can draw their signature with a mouse (desktop) or finger (mobile)
* A "clear" link allows redoing the signature
* Instructions appear: "Use your mouse (or your finger on a phone or tablet) to enter your signature above"
* The signature is captured as an image and included in the PDF
When disabled:
* No signature field appears
* Form submission is faster and simpler
**When to enable**:
* Union authorization cards (may be legally required)
* Legal agreements or waivers
* Forms where you need proof of identity
* Official applications or nominations
**When to disable**:
* General interest forms
* Event registrations
* Casual sign-ups
* Any form where signature isn't legally or procedurally necessary
If you enable the signature field, most users will expect it to be required even if you don't mark it as required. Consider this when designing your form flow.
### Step 7: Add a Legal agreement (optional)
You also have the option of including a section for a **Legal agreement** that a recipient must check before submitting the public form. Check the Legal agreement checkbox and enter the **text** of your agreement in the box below.
This section has two parts: a checkbox to enable the legal agreement, and a text area for the agreement text.
**To add a legal agreement**:
1. Check the box next to **Legal agreement**
2. Enter your agreement text in the **Legal agreement text** text area
3. The legal agreement will be added to your selected fields
4. Mark it as required in the "Selected fields" panel on the Standard fields tab
**How it appears on the form**:
* The legal agreement text displays near the bottom of the form (above signature if enabled)
* A checkbox appears next to or below the text
* The user must check the box to submit the form (if marked as required)
**Legal agreement text** field:
* Large text area for your agreement language
* Supports line breaks
* Supports HTML for formatting
* Placeholder: "I agree that..."
**Common legal agreement examples**:
For union authorization cards:
```
I authorize [Union Name] to represent me in collective bargaining with my employer concerning wages, hours, and working conditions. I understand that this authorization is voluntary and that filling out this form does not obligate me to join the union or pay any fees or dues.
```
For general interest forms:
```
I understand that [Organization Name] will use the information I provide to contact me about campaign activities and events. I can opt out of communications at any time.
```
For NLRB compliance (elections):
```
I understand that signing this card does not obligate me to vote for the union in an NLRB election or to become a union member. I understand that federal law protects my right to sign or not sign this card.
```
**Best practices**:
* Keep legal language as simple as possible
* Break complex agreements into short paragraphs or bullet points
* Consult with legal counsel for union authorization cards
* Include required NLRB disclaimers if applicable
* Don't use legal agreements for casual sign-up forms--they reduce completion rates
**Positioning**:
* Legal agreement text appears in the order you set in "Selected fields" on the Standard fields tab
* It typically appears near the end of the form
* Most campaigns place it just before the signature field (if enabled) or just before the submit button
### Step 8: Enable file attachments (optional)
Check the **"Allow submitter to upload files up to 10 MB"** box to let users attach files to the form submission.
Supported file types include:
* Most image/video files
* MS Office files
* OpenOffice files
* PDF
* Plain text
When enabled:
* A file upload field appears on the public form
* Users can select and upload files
* Maximum file size: 10MB per file
* Uploaded files attach to the contact record in Broadstripes
When disabled:
* No file upload option on the form
**When to enable**:
* Photo uploads for badges or profiles
* Document submission for grievances or complaints
* Supporting materials for applications or requests
**When to skip**:
* Simple interest cards or sign-ups
* Forms where attachments aren't relevant
* Concerns about inappropriate file uploads
Files are scanned and stored securely. Project members can view and manage attachments in the contact record. When you enable attachments, the attachment field is automatically added to your form's selected fields. You control where it appears by dragging it in the "Selected fields" panel.
#### Allow multiple attachments
To permit multiple file uploads (with a total size limit of 10 MB), check the **"Allow multiple attachments"** box.
This checkbox only appears if **Allow submitter to upload files** is enabled.
When enabled:
* Users can upload more than one file
* An "Add another file" button appears after selecting a file
* All uploaded files attach to the contact record
When disabled:
* Users can only upload one file
* Simpler interface
**When to enable**:
* Resume + cover letter uploads
* Multiple supporting documents
* Photo galleries
* Any scenario where one file isn't enough
**When to skip**:
* Most forms only need single file upload
* Reduces complexity for users
#### Custom label for attachment field
You can also enter a descriptive label for the attachment field to inform form submitters about what kind of file(s) they should upload.
This setting only appears if **Allow submitter to upload files** is enabled.
**Default label**: "Attachments"
**Custom label examples**:
* "Upload your document"
* "Profile photo"
* "Supporting documents"
* "Proof of employment"
* "Badge photo"
**Best practice**: Use clear, specific labels that tell users exactly what kind of file to upload.
### Step 9: Save your work
**To upload a logo**:
1. Click the **Add a logo** tile (or drag an image file onto it)
2. Navigate to your logo file on your computer
3. Select the image file
4. Click **Save** at the bottom of the form editor
**To remove a logo**:
1. Click **Remove** below the logo preview
2. Click **Save** at the bottom of the form editor
**To replace a logo**:
1. Click **Replace** below the logo preview and select a new logo
2. The new logo will replace the old one when you save
**Supported formats**: JPG, PNG, GIF
**Recommended size**: Maximum width of 640px and maximum height of 100px
**File size**: Keep the file small for the best experience on a mobile device
When you duplicate a form, the system attempts to copy the logo. If logo copying fails, you'll see a warning message and will need to re-upload the logo to the duplicated form.
### Step 3: Add Header Text
Below the logo, you can enter **Header Text**. This could be your organization's tagline or any title of your choosing.
This is the main title that appears at the top of your form, below the logo (if you uploaded one).
**Default**: If you leave this blank, the form NAME (from the top of the form editor) is used as the header.
**Examples**:
* "Worker Interest Card"
* "Join Our Campaign"
* "2025 Training Registration"
* "Tell Us Your Story"
* "Sign Up to Learn More"
**Best practices**:
* Keep it short (under 10 words)
* Use action-oriented language
* Make it welcoming and clear about the form's purpose
* Consider your audience's language and perspective
### Step 4: Add Introduction text
In the **Introduction** field, add a brief explanation or instructions for the form recipients. This is a good place to tell them what actions to take with the form.
This text appears below the header and above the form fields. Use it to:
* Explain the purpose of the form
* Set expectations (how long it takes, what happens next)
* Provide context or motivation
* Include any necessary disclaimers
**Example for a worker interest card**:
```
We're building a movement for better wages and working conditions. Fill out this form to join us and receive updates about our campaign. This form takes about 2 minutes to complete.
```
**Example for event registration**:
```
Join us for our monthly member meeting on March 15th at 6 PM. Fill out this form to RSVP and receive event details and reminders.
```
**Example for volunteer sign-up**:
```
Want to get involved? We need volunteers for phone banking, door knocking, and event support. Tell us what interests you and we'll be in touch with opportunities to get involved.
```
**Formatting**:
* The introduction text supports line breaks
* Keep paragraphs short for readability
* Consider bullet points for multiple ideas
* Don't make it too long--most people won't read more than 2-3 short paragraphs
**Best practices**:
* Answer "What is this for?" and "Why should I fill this out?"
* Set realistic time expectations
* Mention what happens after submission
* Use welcoming, inclusive language
* If required by law, include NLRB disclaimer: "Filling out this form does not obligate you to do anything or join anything."
## Customize your form with links and HTML styling
The **Introduction** text, **Form submission button text**, and **Legal agreement** fields support hyperlinks and HTML tags, allowing you to format and style your text.
For additional styling needs, please contact in-app support or [support@broadstripes.com](mailto:support@broadstripes.com)
### Step 5: Customize the submission button
Customize your form's **submission button** with a call to action. Create your custom text for submitting in the **"Form submission button text"** field.
This is the label on the button that submits the form.
**Default**: "Submit"
**Example alternatives**:
* "Join Us"
* "Sign Up"
* "Register"
* "Submit My Interest Card"
* "Count Me In"
* "I'm Interested"
* "Save My Information"
**Best practices**:
* Use action language that reflects what the user is doing
* Keep it short (1-3 words)
* Match the tone of your campaign
* Consider what commitment level you're asking for (avoid "JOIN THE UNION" if this is just an interest card)
### Step 6: Add a signature field (optional)
Select the **"Show signature field"** checkbox to allow submitters to sign the form using their mouse or finger.
When enabled:
* A signature capture field appears near the bottom of the form (above the submit button)
* Users can draw their signature with a mouse (desktop) or finger (mobile)
* A "clear" link allows redoing the signature
* Instructions appear: "Use your mouse (or your finger on a phone or tablet) to enter your signature above"
* The signature is captured as an image and included in the PDF
When disabled:
* No signature field appears
* Form submission is faster and simpler
**When to enable**:
* Union authorization cards (may be legally required)
* Legal agreements or waivers
* Forms where you need proof of identity
* Official applications or nominations
**When to disable**:
* General interest forms
* Event registrations
* Casual sign-ups
* Any form where signature isn't legally or procedurally necessary
If you enable the signature field, most users will expect it to be required even if you don't mark it as required. Consider this when designing your form flow.
### Step 7: Add a Legal agreement (optional)
You also have the option of including a section for a **Legal agreement** that a recipient must check before submitting the public form. Check the Legal agreement checkbox and enter the **text** of your agreement in the box below.
This section has two parts: a checkbox to enable the legal agreement, and a text area for the agreement text.
**To add a legal agreement**:
1. Check the box next to **Legal agreement**
2. Enter your agreement text in the **Legal agreement text** text area
3. The legal agreement will be added to your selected fields
4. Mark it as required in the "Selected fields" panel on the Standard fields tab
**How it appears on the form**:
* The legal agreement text displays near the bottom of the form (above signature if enabled)
* A checkbox appears next to or below the text
* The user must check the box to submit the form (if marked as required)
**Legal agreement text** field:
* Large text area for your agreement language
* Supports line breaks
* Supports HTML for formatting
* Placeholder: "I agree that..."
**Common legal agreement examples**:
For union authorization cards:
```
I authorize [Union Name] to represent me in collective bargaining with my employer concerning wages, hours, and working conditions. I understand that this authorization is voluntary and that filling out this form does not obligate me to join the union or pay any fees or dues.
```
For general interest forms:
```
I understand that [Organization Name] will use the information I provide to contact me about campaign activities and events. I can opt out of communications at any time.
```
For NLRB compliance (elections):
```
I understand that signing this card does not obligate me to vote for the union in an NLRB election or to become a union member. I understand that federal law protects my right to sign or not sign this card.
```
**Best practices**:
* Keep legal language as simple as possible
* Break complex agreements into short paragraphs or bullet points
* Consult with legal counsel for union authorization cards
* Include required NLRB disclaimers if applicable
* Don't use legal agreements for casual sign-up forms--they reduce completion rates
**Positioning**:
* Legal agreement text appears in the order you set in "Selected fields" on the Standard fields tab
* It typically appears near the end of the form
* Most campaigns place it just before the signature field (if enabled) or just before the submit button
### Step 8: Enable file attachments (optional)
Check the **"Allow submitter to upload files up to 10 MB"** box to let users attach files to the form submission.
Supported file types include:
* Most image/video files
* MS Office files
* OpenOffice files
* PDF
* Plain text
When enabled:
* A file upload field appears on the public form
* Users can select and upload files
* Maximum file size: 10MB per file
* Uploaded files attach to the contact record in Broadstripes
When disabled:
* No file upload option on the form
**When to enable**:
* Photo uploads for badges or profiles
* Document submission for grievances or complaints
* Supporting materials for applications or requests
**When to skip**:
* Simple interest cards or sign-ups
* Forms where attachments aren't relevant
* Concerns about inappropriate file uploads
Files are scanned and stored securely. Project members can view and manage attachments in the contact record. When you enable attachments, the attachment field is automatically added to your form's selected fields. You control where it appears by dragging it in the "Selected fields" panel.
#### Allow multiple attachments
To permit multiple file uploads (with a total size limit of 10 MB), check the **"Allow multiple attachments"** box.
This checkbox only appears if **Allow submitter to upload files** is enabled.
When enabled:
* Users can upload more than one file
* An "Add another file" button appears after selecting a file
* All uploaded files attach to the contact record
When disabled:
* Users can only upload one file
* Simpler interface
**When to enable**:
* Resume + cover letter uploads
* Multiple supporting documents
* Photo galleries
* Any scenario where one file isn't enough
**When to skip**:
* Most forms only need single file upload
* Reduces complexity for users
#### Custom label for attachment field
You can also enter a descriptive label for the attachment field to inform form submitters about what kind of file(s) they should upload.
This setting only appears if **Allow submitter to upload files** is enabled.
**Default label**: "Attachments"
**Custom label examples**:
* "Upload your document"
* "Profile photo"
* "Supporting documents"
* "Proof of employment"
* "Badge photo"
**Best practice**: Use clear, specific labels that tell users exactly what kind of file to upload.
### Step 9: Save your work
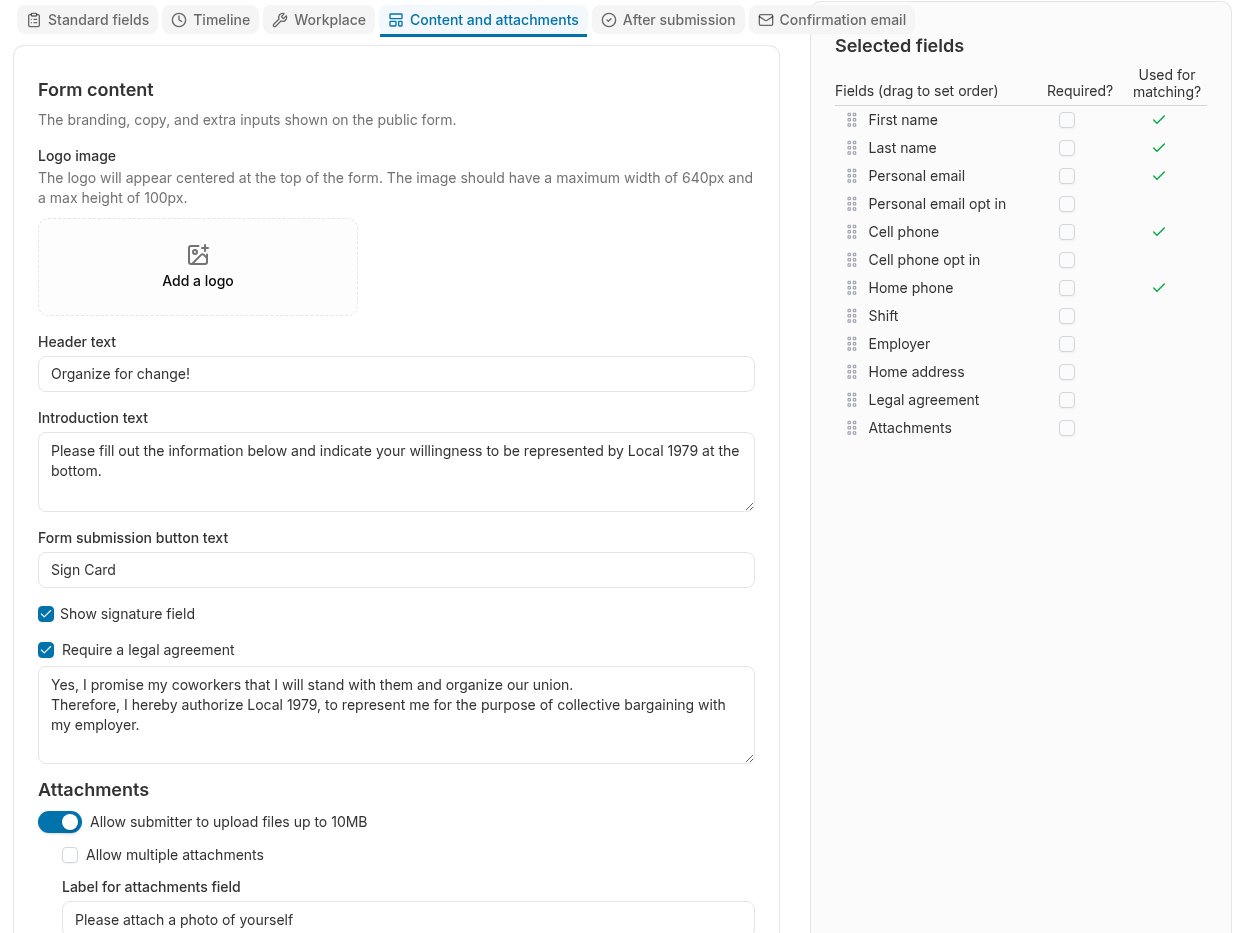 **Save** or move on to the next tab to continue customizing your public form.
## How Content Appears on the Form
When someone opens your public form, they see (in order):
1. **Logo** (if uploaded) - centered at top
2. **Header text** - main title
3. **Introduction text** - explanatory paragraph(s)
4. **Required field notice** - "Fields marked with an asterisk (\*) are required"
5. **Form fields** - in the order you configured
6. **Legal agreement text** (if enabled this will appear in the order you set in "Selected fields" on the Standard fields tab) - with checkbox
7. **Signature field** (if enabled) - with canvas and "clear" link
8. **Submit button** - with your custom button text
## How Attachments Work
When a form with attachments enabled is submitted:
1. **File upload**: User selects file(s) from their device
2. **Validation**: Broadstripes checks file size (must be under 10MB)
3. **Storage**: Files are uploaded to secure storage
4. **Attachment record**: An attachment record is created and linked to the contact
5. **Availability**: Files appear in the contact's Attachments section in Broadstripes
**Viewing attachments**:
* Go to the contact record in Broadstripes
* Click the Attachments tab
* All form-submitted files appear along with any other attachments for the contact
**File formats supported**: Most common file formats (PDF, DOCX, JPG, PNG, etc.)
**File size limit**: 10MB per file (enforced at upload time)
## Testing Your Form Content
Before sharing your form widely:
1. Click **Save** to save your content changes
2. Copy the public form URL from the Public forms page
3. Open the URL in a private/incognito browser window
4. Review all the content:
* Does the logo display correctly?
* Is the header clear and welcoming?
* Does the introduction provide enough context?
* Is the legal agreement text clear and accurate?
* Does the submit button text make sense?
5. Submit a test entry
6. Check the confirmation message (configured in the **After submission tab**)
**View on mobile**: Many people will complete your form on a phone. Test on a mobile device or use your browser's mobile device emulation to ensure everything displays correctly.
## Accessibility Considerations
**Clear headings**: The header text becomes the main heading for screen readers
**Simple language**: Keep introduction text clear and concise for all literacy levels
**Legal agreement readability**: Break complex legal text into short paragraphs
**Signature field**: Includes clear instructions for all users
## Common Scenarios
### Basic Interest Card
* Logo: Union logo
* Header: "Worker Interest Card"
* Introduction: "Want to learn more about organizing for better conditions? Fill out this card and an organizer will contact you."
* Button: "Submit"
* Signature: Disabled
* Legal agreement: None
### Union Authorization Card
* Logo: Union logo
* Header: "Union Authorization Card"
* Introduction: "By signing this card, you're authorizing \[Union] to represent you. Your signature does not obligate you to join the union or vote yes in an election."
* Button: "Sign Card"
* Signature: Enabled
* Legal agreement: Full NLRB-compliant authorization language
### Event Registration
* Logo: Campaign logo
* Header: "March Member Meeting"
* Introduction: "Join us March 15th at 6 PM for our monthly meeting. We'll discuss upcoming actions and vote on proposals. Dinner will be provided."
* Button: "Register"
* Signature: Disabled
* Legal agreement: None
### Volunteer Sign-Up
* Logo: Organization logo
* Header: "Get Involved"
* Introduction: "We need volunteers for phone banking, door knocking, and event support. Sign up and we'll match you with opportunities that fit your schedule and interests."
* Button: "Sign Up"
* Signature: Disabled
* Legal agreement: None
## Next Steps
Here are links to the other documentation pages for public forms:
* [Create a new public form](./create-public-form)
* [The "Standard fields" tab](./standard-fields-tab-in-public-form)
* [The "Timeline" tab](./timeline-tab)
* [The "Workplace" tab](./employment-tab)
* [The "Confirmation email" tab](./email-tab)
* [The "After submission" tab](./other-options-tab)
* [Viewing and downloading public forms](./viewing-and-downloading-public-forms)
**Save** or move on to the next tab to continue customizing your public form.
## How Content Appears on the Form
When someone opens your public form, they see (in order):
1. **Logo** (if uploaded) - centered at top
2. **Header text** - main title
3. **Introduction text** - explanatory paragraph(s)
4. **Required field notice** - "Fields marked with an asterisk (\*) are required"
5. **Form fields** - in the order you configured
6. **Legal agreement text** (if enabled this will appear in the order you set in "Selected fields" on the Standard fields tab) - with checkbox
7. **Signature field** (if enabled) - with canvas and "clear" link
8. **Submit button** - with your custom button text
## How Attachments Work
When a form with attachments enabled is submitted:
1. **File upload**: User selects file(s) from their device
2. **Validation**: Broadstripes checks file size (must be under 10MB)
3. **Storage**: Files are uploaded to secure storage
4. **Attachment record**: An attachment record is created and linked to the contact
5. **Availability**: Files appear in the contact's Attachments section in Broadstripes
**Viewing attachments**:
* Go to the contact record in Broadstripes
* Click the Attachments tab
* All form-submitted files appear along with any other attachments for the contact
**File formats supported**: Most common file formats (PDF, DOCX, JPG, PNG, etc.)
**File size limit**: 10MB per file (enforced at upload time)
## Testing Your Form Content
Before sharing your form widely:
1. Click **Save** to save your content changes
2. Copy the public form URL from the Public forms page
3. Open the URL in a private/incognito browser window
4. Review all the content:
* Does the logo display correctly?
* Is the header clear and welcoming?
* Does the introduction provide enough context?
* Is the legal agreement text clear and accurate?
* Does the submit button text make sense?
5. Submit a test entry
6. Check the confirmation message (configured in the **After submission tab**)
**View on mobile**: Many people will complete your form on a phone. Test on a mobile device or use your browser's mobile device emulation to ensure everything displays correctly.
## Accessibility Considerations
**Clear headings**: The header text becomes the main heading for screen readers
**Simple language**: Keep introduction text clear and concise for all literacy levels
**Legal agreement readability**: Break complex legal text into short paragraphs
**Signature field**: Includes clear instructions for all users
## Common Scenarios
### Basic Interest Card
* Logo: Union logo
* Header: "Worker Interest Card"
* Introduction: "Want to learn more about organizing for better conditions? Fill out this card and an organizer will contact you."
* Button: "Submit"
* Signature: Disabled
* Legal agreement: None
### Union Authorization Card
* Logo: Union logo
* Header: "Union Authorization Card"
* Introduction: "By signing this card, you're authorizing \[Union] to represent you. Your signature does not obligate you to join the union or vote yes in an election."
* Button: "Sign Card"
* Signature: Enabled
* Legal agreement: Full NLRB-compliant authorization language
### Event Registration
* Logo: Campaign logo
* Header: "March Member Meeting"
* Introduction: "Join us March 15th at 6 PM for our monthly meeting. We'll discuss upcoming actions and vote on proposals. Dinner will be provided."
* Button: "Register"
* Signature: Disabled
* Legal agreement: None
### Volunteer Sign-Up
* Logo: Organization logo
* Header: "Get Involved"
* Introduction: "We need volunteers for phone banking, door knocking, and event support. Sign up and we'll match you with opportunities that fit your schedule and interests."
* Button: "Sign Up"
* Signature: Disabled
* Legal agreement: None
## Next Steps
Here are links to the other documentation pages for public forms:
* [Create a new public form](./create-public-form)
* [The "Standard fields" tab](./standard-fields-tab-in-public-form)
* [The "Timeline" tab](./timeline-tab)
* [The "Workplace" tab](./employment-tab)
* [The "Confirmation email" tab](./email-tab)
* [The "After submission" tab](./other-options-tab)
* [Viewing and downloading public forms](./viewing-and-downloading-public-forms)