> ## Documentation Index
> Fetch the complete documentation index at: https://help.broadstripes.com/llms.txt
> Use this file to discover all available pages before exploring further.
# Import a spreadsheet
> Step-by-step walkthrough of the Broadstripes data import wizard, from uploading a file through mapping columns, previewing, and running the import.
This article walks through the import wizard from beginning to end: uploading a file, mapping its columns, choosing configuration options, previewing, and running the import.
**Prerequisites:**
* Your spreadsheet is [prepared for import](/docs/data-import-admin/data-sources) (XLS, XLSX, or CSV, with a header row).
* Your project is [set up to receive the data](/docs/start-project/set-up-a-project) — custom fields, external systems, and events created ahead of time.
* You are a project admin, or a basic user who has been granted the **Can perform data imports** permission.
This walkthrough follows a first import, which creates new records. If you're re-importing data to **update contacts that are already in Broadstripes**, read this page first, then see [Update existing contacts with an import](/docs/data-import-admin/update-contacts-with-an-import) for the matching options.
## Start a new import
1. Click the **Project settings** icon in the top-right corner of any page (or press **Ctrl-K** / **⌘K**), then choose **Data imports**. You can start typing to filter the list.
2. This opens the **Data Imports** page, which lists any imports already created in the project.
3. Click the **+ New\...** button.
The import form has three numbered sections that open as you progress: **1. Upload data file**, **2. Define data mappings**, and **3. Preview results**.
## 1. Upload data file
1. If you want, type a **Name** for the import.
**Should I name the import?**
Naming an import is optional, but a description can jog your memory later (for instance, "All Workers with Employments"). Unnamed imports display the name of the import file (for example, "contact\_list\_01.csv").
2. Click the file field to locate your spreadsheet on your computer and upload it to Broadstripes. Accepted formats are XLSX, XLS, and CSV.
Broadstripes processes the file for a moment (time depends on file size), then opens the **2. Define data mappings** section.
**Uploaded the wrong file?** After the file uploads, a **Change file** button appears next to the download link. Click it to select a replacement spreadsheet. The page reloads after the swap so the column mappings, unique-value previews, and preview results all update against the new file. The button is available until you schedule or run the import.
If a [saved configuration](#configuration-options-reusing-your-work) exists whose columns exactly match your file's headers, Broadstripes automatically applies it — mappings and options come pre-filled from the earlier import.
## 2. Define data mappings
"Mapping" means the data in a spreadsheet column will be transferred into a selected field in Broadstripes. During this step you're teaching Broadstripes which columns in your spreadsheet relate to which Broadstripes fields.
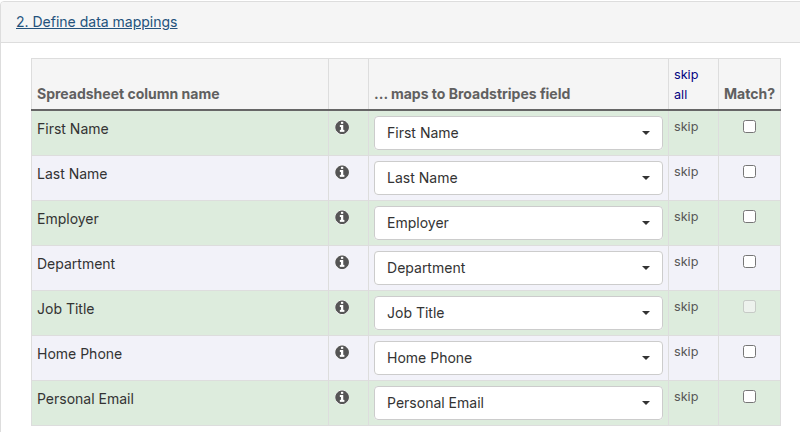 Each spreadsheet column gets a row in the mapping table:
* Broadstripes **automatically maps** any column whose header it recognizes, based on the text in the first row of your spreadsheet. Recognition is forgiving about capitalization, spacing, and hyphens.
* To correct a mapping or map an unrecognized column, open the drop-down in the **...maps to Broadstripes field** column. The fields are grouped (People, Employment, Contact Info, Addresses, Custom Fields, and so on), and you can type in the drop-down's search box to filter — typing "address" shows only address-related fields.
* Columns Broadstripes doesn't recognize stay on **(Skip this field)**. Anything left on **(Skip this field)** is ignored during the import — which is exactly what you want for columns you don't need.
* Click **skip** at the end of a row to clear that column's mapping, or **skip all** in the table header to clear every mapping and start over.
* Click the info icon next to a spreadsheet column name to see the most frequent values in that column, with counts. This is useful for confirming a column contains what you think it contains before you import it.
* The **Match?** checkboxes tell Broadstripes to find existing records instead of always creating new ones. Leave them unchecked for a first import — they're covered in [Update existing contacts with an import](/docs/data-import-admin/update-contacts-with-an-import).
### Things to keep in mind when mapping
* Columns with **employment information** (Employer, Department, Job Title, and so on) need to be mapped to the corresponding fields to create a turf structure. If you map **Department**, you must also map **Employer** — the form will remind you if you don't.
* Two columns can't map to the same Broadstripes field.
* Custom field columns can only be mapped if the custom field already exists in your project. For dropdown-style custom fields, enable **Allow imports to add options** on the field if your spreadsheet contains values that don't exist as options yet (see the [data import fields reference](/docs/data-import-admin/data-import-fields)).
## Configuration: what will this import do?
Below the mapping table, the **Configuration** panel shows what the import will do with your rows. What you see here depends on your mappings — with no **Match?** boxes checked, it confirms that all valid data rows will be added as new records, and offers:
* **Avoid creating duplicates by matching on:** — a safety net for first imports into a project that already has contacts. Broadstripes checks each incoming row against existing records by name (always last name, optionally first name, middle name, and nickname), with optional fuzzy name matching and optional scoping to the same employer and department. Rows that look like an existing person can either update that person or be skipped, using the **These matched records should be** drop-down.
* **Employments** — if you mapped employment columns, the **Automatically create shops and departments and link employments** checkbox appears. Check it to have Broadstripes build the turf structure (shops, departments, sub-departments) from your employment columns and place workers in it during import. It's checked automatically when your file includes employment hierarchy data.
## Configuration options: reusing your work
If you'll re-import files with the same layout in the future (for example, a monthly membership export), you can save everything you just set up — field mappings, match settings, and policies — as a **saved configuration**:
* **Do not save this configuration** — for one-off imports (the default).
* **Create a new configuration** — name the configuration, and optionally tie it to an [external system](/docs/project-settings/external-systems-settings). Available to project admins.
* **Select an existing configuration** — apply a previously saved configuration to this import.
Saved configurations are listed on the **Saved Configurations** tab of the Data Imports page, and Broadstripes automatically applies one when you upload a file whose columns exactly match it.
## Preview the results
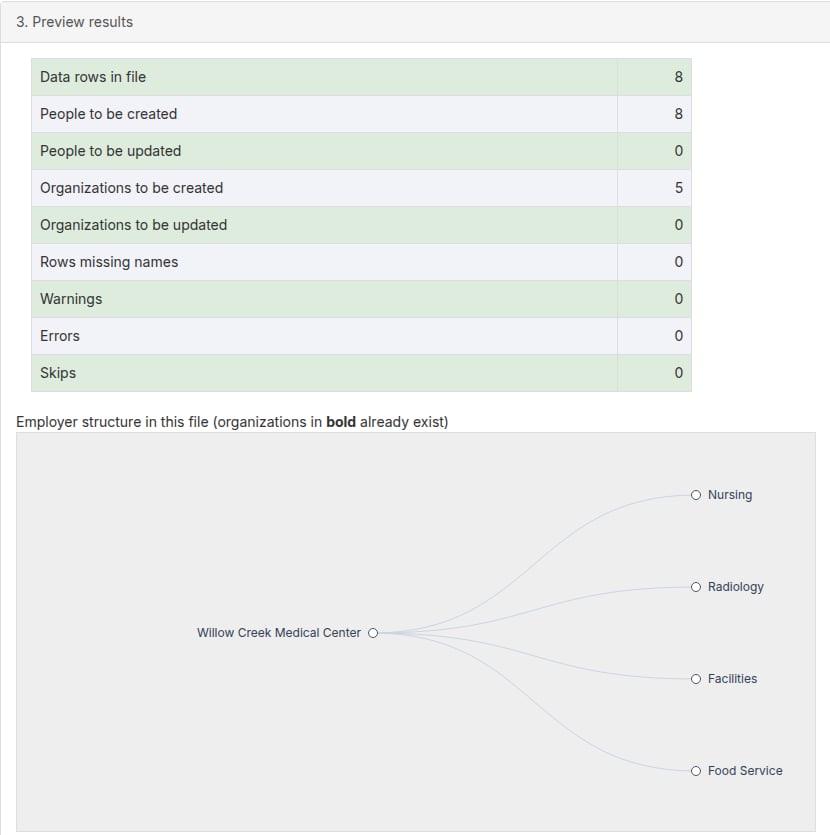
1. Click **Preview**. Broadstripes analyzes the file (a progress bar tracks it) and opens the **3. Preview results** section. Nothing is imported yet — the preview is a dry run.
2. The results table shows what **will** happen: data rows in the file, people to be created and updated, organizations to be created and updated, rows missing names, and counts of warnings, errors, and skips.
3. Expand the **Warnings**, **Errors**, or **Skips** rows to see the row number and issue for each affected spreadsheet row.
4. If you checked **Automatically create shops and departments and link employments**, an **Employer structure** tree appears, showing the department hierarchy that will be created. Organizations that already exist in your project are shown in **bold**, so you can tell at a glance what will be newly created. Click any branch to expand or collapse it.
Each spreadsheet column gets a row in the mapping table:
* Broadstripes **automatically maps** any column whose header it recognizes, based on the text in the first row of your spreadsheet. Recognition is forgiving about capitalization, spacing, and hyphens.
* To correct a mapping or map an unrecognized column, open the drop-down in the **...maps to Broadstripes field** column. The fields are grouped (People, Employment, Contact Info, Addresses, Custom Fields, and so on), and you can type in the drop-down's search box to filter — typing "address" shows only address-related fields.
* Columns Broadstripes doesn't recognize stay on **(Skip this field)**. Anything left on **(Skip this field)** is ignored during the import — which is exactly what you want for columns you don't need.
* Click **skip** at the end of a row to clear that column's mapping, or **skip all** in the table header to clear every mapping and start over.
* Click the info icon next to a spreadsheet column name to see the most frequent values in that column, with counts. This is useful for confirming a column contains what you think it contains before you import it.
* The **Match?** checkboxes tell Broadstripes to find existing records instead of always creating new ones. Leave them unchecked for a first import — they're covered in [Update existing contacts with an import](/docs/data-import-admin/update-contacts-with-an-import).
### Things to keep in mind when mapping
* Columns with **employment information** (Employer, Department, Job Title, and so on) need to be mapped to the corresponding fields to create a turf structure. If you map **Department**, you must also map **Employer** — the form will remind you if you don't.
* Two columns can't map to the same Broadstripes field.
* Custom field columns can only be mapped if the custom field already exists in your project. For dropdown-style custom fields, enable **Allow imports to add options** on the field if your spreadsheet contains values that don't exist as options yet (see the [data import fields reference](/docs/data-import-admin/data-import-fields)).
## Configuration: what will this import do?
Below the mapping table, the **Configuration** panel shows what the import will do with your rows. What you see here depends on your mappings — with no **Match?** boxes checked, it confirms that all valid data rows will be added as new records, and offers:
* **Avoid creating duplicates by matching on:** — a safety net for first imports into a project that already has contacts. Broadstripes checks each incoming row against existing records by name (always last name, optionally first name, middle name, and nickname), with optional fuzzy name matching and optional scoping to the same employer and department. Rows that look like an existing person can either update that person or be skipped, using the **These matched records should be** drop-down.
* **Employments** — if you mapped employment columns, the **Automatically create shops and departments and link employments** checkbox appears. Check it to have Broadstripes build the turf structure (shops, departments, sub-departments) from your employment columns and place workers in it during import. It's checked automatically when your file includes employment hierarchy data.
## Configuration options: reusing your work
If you'll re-import files with the same layout in the future (for example, a monthly membership export), you can save everything you just set up — field mappings, match settings, and policies — as a **saved configuration**:
* **Do not save this configuration** — for one-off imports (the default).
* **Create a new configuration** — name the configuration, and optionally tie it to an [external system](/docs/project-settings/external-systems-settings). Available to project admins.
* **Select an existing configuration** — apply a previously saved configuration to this import.
Saved configurations are listed on the **Saved Configurations** tab of the Data Imports page, and Broadstripes automatically applies one when you upload a file whose columns exactly match it.
## Preview the results
1. Click **Preview**. Broadstripes analyzes the file (a progress bar tracks it) and opens the **3. Preview results** section. Nothing is imported yet — the preview is a dry run.
2. The results table shows what **will** happen: data rows in the file, people to be created and updated, organizations to be created and updated, rows missing names, and counts of warnings, errors, and skips.
3. Expand the **Warnings**, **Errors**, or **Skips** rows to see the row number and issue for each affected spreadsheet row.
4. If you checked **Automatically create shops and departments and link employments**, an **Employer structure** tree appears, showing the department hierarchy that will be created. Organizations that already exist in your project are shown in **bold**, so you can tell at a glance what will be newly created. Click any branch to expand or collapse it.
 If you change any mapping or configuration option after previewing, the preview is cleared and you'll need to click **Preview** again before you can run the import.
## Run the import
Once the preview looks correct, the run controls appear below the preview results:
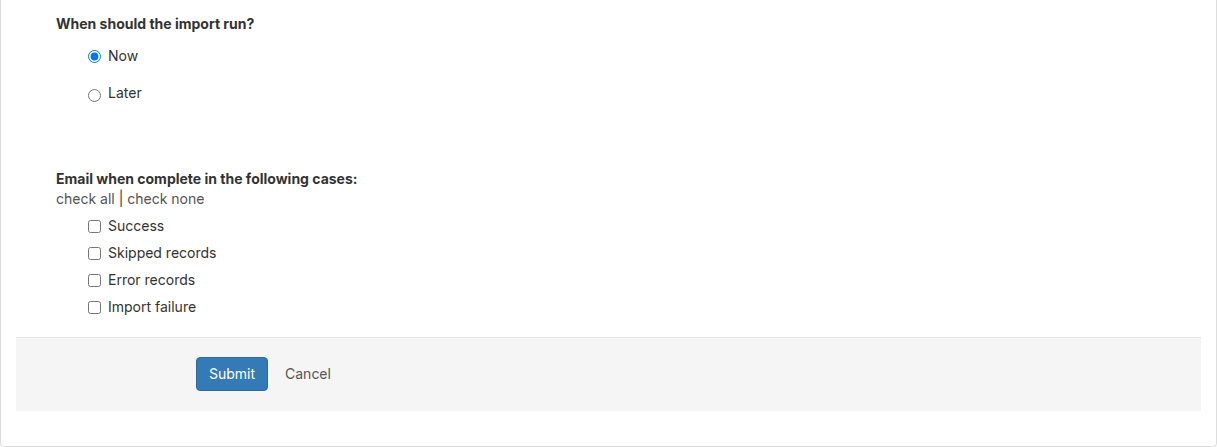
1. Under **When should the import run?**, keep **Now**, or choose **Later** and pick a date and time (US Eastern Time) to schedule it.
2. Optionally, have Broadstripes **email you when the import completes** — choose which outcomes should trigger the email (Success, Skipped records, Error records, Import failure) and who receives it.
3. Click **Submit**.
If you change any mapping or configuration option after previewing, the preview is cleared and you'll need to click **Preview** again before you can run the import.
## Run the import
Once the preview looks correct, the run controls appear below the preview results:
1. Under **When should the import run?**, keep **Now**, or choose **Later** and pick a date and time (US Eastern Time) to schedule it.
2. Optionally, have Broadstripes **email you when the import completes** — choose which outcomes should trigger the email (Success, Skipped records, Error records, Import failure) and who receives it.
3. Click **Submit**.
 The import runs in the background. Back on the **Data Imports** page, you can watch its status update in real time — a progress bar tracks the rows processed, and you can stop a running import if something looks wrong (changes already made will remain).
**Final check**
Imports are permanent and cannot be undone once they run. Make sure you've reviewed the preview results thoroughly before submitting.
### Next steps
When the import finishes, review what it did: [Analyze import results](/docs/data-import-admin/analyze-import-results)
The import runs in the background. Back on the **Data Imports** page, you can watch its status update in real time — a progress bar tracks the rows processed, and you can stop a running import if something looks wrong (changes already made will remain).
**Final check**
Imports are permanent and cannot be undone once they run. Make sure you've reviewed the preview results thoroughly before submitting.
### Next steps
When the import finishes, review what it did: [Analyze import results](/docs/data-import-admin/analyze-import-results)